Sight Words :: How to Teach

Sight Words to become a more fluent reader

Have you ever sat with your child and agonized over their struggle as they attempt to sound out every word they come across?

Sight words, or high frequency words, are the words that your child should be able to recognize just from looking at.  Sight words are one of the foundation skills of reading that help emergent readers to fluently read a page without having to sound out every word they come across.  The lists of sight words include the most commonly found words at each reading level. By learning these words your child will be set up for success to read.

When do I start teaching sight words?

Your child is ready to start working on sight words around ages 4 – 5.  If your child is in Kindergarten, then you should be working on sight words.  Another way to tell if your child is ready to work on sight words is if they can name the lowercase letters of the alphabet.  

How do I teach sight words? Your very first session.

The key to teaching sight words is only do a few at a time, for short ten minute sessions.  Since this is your very first session I’ll lay everything out for you to follow in an easy script as if this were the very first time you were doing this with your child.  This is a quick pace to keep your child interested and to move through three words in a short amount of time.

We are going to start working on reading words together!  I am going to start by showing you a word, and then saying it, and then you are going to say it back to me.  We will underline the word with our fingers each time we say it.

Ready?  It’s my turn.  This word is see. [underline the word with your finger]  Again, see [underline the word with your finger].  Your turn, what word?

Child: See. [child should underline the word with their finger]

Yes! – I see a dog. See. [underline the word with your finger] Your turn, what word?

Child: See.

Again.

Child: See

Last time

Child:  See

Now we are going to Spell the word.  First we will say the word, then touch each letter as we say them, then say the word again.  I underline the word with my finger when I say it.

This is my turn.  See [underline]; S [tap] E [tap] E  [tap] ; See [underline]

Again.  See [underline]; S [tap] E [tap] E  [tap] ; See [underline]

Now it’s your turn.

Child: See [underline]; S [tap] E [tap] E  [tap] ; See [underline]

Yes! Do it again, get ready, go.

Child: See [underline]; S [tap] E [tap] E  [tap] ; See [underline]

Yes! Last time.

Child: See [underline]; S [tap] E [tap] E  [tap] ; See [underline]

Great job.  You spelled the word.

Now we are going to do it again, but this time we are going to write the word after we say it.  I will go first. I say the word, then I will say and write the letters with my finger in the air, and then say the word again.  We underline the word with our finger each time we say it.

This is is my turn.  See [underline]; S [draw with a finger] E [draw with a finger] E  [draw with a finger] ; See [underline]

I will do it again.

See [underline]; S [draw with a finger] E [draw with a finger] E  [draw with a finger] ; See [underline]

Now it is your turn.  

Child: See [underline]; S [draw with a finger] E [draw with a finger] E  [draw with a finger] ; See [underline]

Yes! Again.

Child: See [underline]; S [draw with a finger] E [draw with a finger] E  [draw with a finger] ; See [underline]

Yes! One more time.

Child: See [underline]; S [draw with a finger] E [draw with a finger] E  [draw with a finger] ; See [underline]

Fantastic, you said the word and wrote the letters with your fingers.

Our last activity is to write it in on the table with our finger.  We will sit at the table to do this activity.

This is my turn.   See [underline]; S [draw with a finger] E [draw with a finger] E  [draw with a finger] ; See [underline]

I will do it again.

See [underline]; S [draw with a finger] E [draw with a finger] E  [draw with a finger] ; See [underline]

Now it is your turn.  

Child: See [underline]; S [draw with a finger] E [draw with a finger] E  [draw with a finger] ; See [underline]

Yes! Again.

Child: See [underline]; S [draw with a finger] E [draw with a finger] E  [draw with a finger] ; See [underline]

Yes! One more time.

Child: See [underline]; S [draw with a finger] E [draw with a finger] E  [draw with a finger] ; See [underline]

Fantastic, you said the word and wrote the letters with your fingers.


Now you can repeat the whole process two more times.  Maybe go and to?


Your future sight word sessions.

Now that you have introduced sight words it is time to get in the habit of doing sight word sessions.  Again, these should take less than ten minutes total to do.

Begin by reviewing the words you have already done with your child.  Show your child a card, such as go.

I am going to show you a card, I want you to say the word and underline it with your finger.  Here is the word.

[show the card]

Child: Go

Yes! Again.

Child: Go

Now this one. [show a new card]

Child: See

Yes! Again.

Child: See

Now this one. [show another card]

Child: [pauses or says the incorrect word]

That word is to.  What word?

Child: to

Yes, again, what word?

Child: to

Yes, to!  We travel to the zoo. Again, what word?

Child: to


We will go through the learning activities for introducing the word to the child again in order to reinforce it.  If there is only one word that needs to be reinforced with the whole set of activities, then absolutely introduce a new word as well.  If we have to go through this process with more than one word, today is not the day to introduce additional new sight words.


Photo by Estée Janssens on Unsplash

Learn to Read :: Rhyming

Learn to Read with Rhyme

Practice Rhyming with your Child

Learning to read is not simply about putting the written word in front of a child.  The bedrock of early literacy is listening and speaking.  A child that grows their vocabulary through speaking and listening is going to be set up to acquire reading and writing.

By practicing rhymes with your child, you will set them up to understand phonemic awareness and discern letter sounds audibly.  The great thing about rhyming is it comes in many forms and can be done with zero preparation.  Try the following activities with your child when you are on a walk, in the car, cleaning up the house, or in any situation where you want to integrate it into your daily life. Continue reading “Learn to Read :: Rhyming”

Plan for your Learning Environment by the Pool

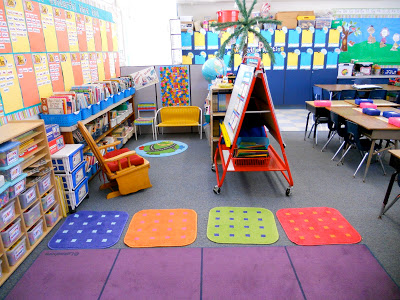
Classroom Learning Environment

A Checklist for an Effective Classroom

Your classroom is where you and your students will spend the majority of your time. Make it the most effective use of space right from the start by planning it out using the checklist. The best designed classrooms end up saving nearly a week worth of time over the course of the year by maximizing transitions and information in the classroom.

Learning Environment Checklist

[ ] Classroom Big Goal for the Year
[ ] Interactive Word Wall visible at student level
[ ] Small Group Area
[ ] Whole Group Meeting Area
[ ] Behavior Chart
[ ] Student Refocus Spot
[ ] Daily Schedule
[ ] Daily Learning Objective Area
[ ] Number Line
[ ] College Bound Culture
[ ] Data Wall for Class and Individual
[ ] Character Traits
[ ] Student Behavior Expectations
[ ] Evidence of High Order Questions
[ ] Sentence Stems for Discussion

Learning Environment Inspirations

The photographs below come from across the web. By clicking on each picture it will take you to the website where the photograph can be found.

Classroom Big Goal for the Year

Interactive Word Wall visible at student level

Math Words

Small Group Area

Small Group Instruction

Continue reading “Plan for your Learning Environment by the Pool”

Setting Classroom Goals

What is most central and important for your classroom to accomplish?

As an administrator myself, I know that time is valuable.  The PD days prior to welcoming students back in to the building are never enough time when you consider getting classrooms ready, teaching about new district mandates, and the culture building that goes on.  My school is a title I school that has made big gains in proficiency and student growth.   I want to share with you the e-mails and summer requests that ensure teachers come back prepared with the best practices and preparations to push students to make more than a year and a half growth.  Feel free to forward the whole e-mail or copy-paste below the line to your whole staff.

Teachers, Students, and Parents need to know where they are going.

A teacher that knows where they want their students to be at the end of the year will take their class further.  Follow the steps below to create a classroom goal that will push your students to mastery.

Figure out what mastery of the most important standards look like

It is tremendously helpful to identify what is most central and important for your grade level and course as you begin to set a big goal. There are a lot of learning goals for your grade level or course, so it’s critical that you know which of them deserve particular focus.

As you read through your Common Core or your State Standards ask yourself the following questions:

Endurance?

Will this learning goal provide students with knowledge and skills that will be of value beyond a single test date?
For example: Writing proficiency will endure throughout a school career and professional life.

Leverage?

Will this learning goal provide knowledge and skills that will be of value in multiple fields of study?
For example: The ability to create graphs and charts as well as draw accurate conclusions from them will help students in math, science, social studies, and language arts.

Readiness?

Will this learning goal provide students with essential knowledge and skills that are necessary for success in the next grade or level of instruction? (Don’t overthink it)
For example: A third grader must be proficient in 3rd grade level reading comprehension to enter the fourth grade and pursue 4th grade-level studies with success.

District/State Priority?

Sometimes the answer just lands in your lap.  Your state or district may just declare, here is the priority standard; and that trumps your list. Continue reading “Setting Classroom Goals”

Prevent Escalations

A Ruler is not a Discipline Tool

Low Profile Intervention

Most students are sent to the office and disciplined due to confrontational escalation, or disrespect.  The teacher often started off by correcting the student for a minor issue and then the student loses control.  Often the student and teacher are swept up in a verbal maelstrom that seems to have erupted from something minor.

The effective teacher is moving around room and monitors the class.  She knows when a student may need a reminder or correction; and does so without drawing attention to the student.

Action Steps

  • Quietly ask a student to change their behavior so that others cannot hear.
  • Use a stern look rather than a verbal command.
  • Remind the whole class that now is not a time for talking.

Photo by Scott Akerman

Digesting State Standards

Making Sense of State Standards

Whether you are a veteran teacher or a newcomer, it is essential to understand what the state mandates your students to understand by the end of your class.  Your state’s standards give you the skills your students must master by the end of your class.  In order to be a successful teacher in a standards age, it is imperative to thoroughly understand what you are expected to teach.

History of Standards

In the 1990’s President George H. W. Bush set broad education goals with all state governors for the youth of America to meet by 2000.   President Bill Clinton and Congress passed the Goals 2000 : Educate America Act which created laws for the states and began the creation of standards by states.  Standards were put in place.  While George W. Bush was in office in the No Child Left Behind Act was passed.  Schools now must prove their students were achieving the standards by  testing.  Controversy ensues.

An Argument for Standards

Arguing for or against the standards as well as testing is currently a moot point, they are legally mandated.  So let us look at the good that standards create and how they help teachers be better.

Is This Just Teaching the Test?

Quality Instruction and Test Preparedness are not mutually exclusive concepts.  Effective teachers in an era of accountability do not set their sights on passing a test, but rather on nurturing a clear grasp of concepts, ideas, and skills.

Planning

Standards created by the state are the same for all students in the state.  The standards document is a great planning document that adds direction and expectations for teachers to pursue.  Unlike Public Schools, private schools often have no standards and the teacher is allowed to teach whatever it is that they please.  For some private schools a teacher may cover a lot, and others may only cover a small amount of content.  Public Schools are legally mandated to cover specific content and that makes the planning for the class very straight forward.  Without standards every classroom would be taught different content and many would not receive enough instruction.

Reading the Standards

Standards are often organized in to three tiers.  Each tier is more specific than the preceding tier.  The names of these tiers is different in each state.  By looking over the document you will see how each standard falls in to the tiers.

Standard or Strand

The broadest standard.  There are relatively few of these standards in the standards document, they are large and often require multiple teaching units to cover them.

Learning Goal

The next level of the standards.  This level is the building block of units.  The units you teach in class can include several learning goals.  A learning goal will take several days or weeks to teach.

Objective

The most specific level of the standards is the objective.  The objectives are often grouped together to form a learning goal.  You should aim to cover at least one objective in your daily lesson.

NC Grade 7 History

History Standard

Standard: Red Circle

Learning Goal: Blue Circle

Objectives: Yellow

Visual Representation

StandardsImage

Action Step

Create a document with your standards in an easy to read format.  Copy your individual learning goal and add the objectives below it.  Don’t worry about the highest level, the Standard.  We want a document that is just learning goals and objectives.  This document can be used throughout the year as you create daily lessons and unit plans.

Learning Goal and Objectives

Take it Further

If you found this helpful consider signing up for the Backwards Planning Course where you will be walked through this step by step.

Want more FREE professional development?  Sign up for the newsletter to receive updates that are not released on the website.  I will never sell or give away your e-mail address.  SIGN UP